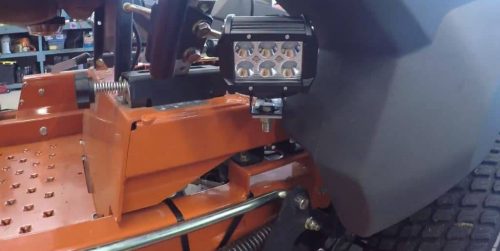
Headlights on a zero turn? Do you really think you need it? But seriously though, putting headlights on your ZTR mower is not just for decoration, like headlights in a car, your mower needs one too. This is especially true for commercial zero-turn mowers. Mowing from dusk till dawn or into the evening to complete a mowing task is common for many residential lawn services. And to do that, you need to have full visuals on the lawn and the grass to mow effectively. To make it simpler and cheaper, here’s a quick guide on how to wire lights on zero turn mower yourself.
Do you really need headlights?
As I’ve mentioned, having full visuals of mowing the property is essential for those who can only mow their lawn in the morning or later into the night. But more than that, it’s also quite helpful when you’re navigating your way out and into your garage, barn, or storage area. It is also perfect when you’re hired to mow a field at night before a big game.
Whichever it may be, a simple set of headlights can really make a difference especially in taking an hour off mowing in the dark.
Benefits of Mowing When the Sun is Down
Whether you’re mowing at dawn, at dusk, or at night, there are many reasons why many prefer mowing the grass when the sun isn’t out.
- No sunburns
You don’t have to face the wrath of the sun at its high peak when you’re mowing at night. The air is cool and you don’t have to suffer getting any sunburns, prickly heat, or other sun-related skin problems.
- No distractions and obstructions
The best time to mow your grass is when your property is completely free from any obstructions, with no kids playing around the lawn, or dogs constantly barking at your noisy mower.
How to Wire Lights on Zero Turn Mower

- Things You Need:
- A socket and wrench set (view on Amazon)
- Electrical tape
- Zip ties
- Wire strippers
- Wire crimpers
- Heat shrink butt connectors
- Driller (view on Amazon)
- Preparation:
- Before you purchase any lights for your mower, make sure to measure the spaces where you want to put them. The best places to put them are:
- over your front wheels
- right by the foot deck
- over your rear wheels
- by the end of your engine ( if your engine sits behind your seat)
- Measure the areas you want to fit your lights in before purchasing what kind of light you need.
- Mounting the lights:
- Prepare your mounting holes. If there are bolts over areas where your lights can fit, it’s best to remove the bolts instead of drilling holes in your mower.
- If you want to mount your light in places that don’t have existing bolts, simply drill just the right hole for your mounting bracket.
- Affix your mounting bracket on and bolt it on your mower.
- Position your lights and secure them with a bolt or a screw that came with them.
- Do this with all the lights you purchased for your mower.
- Creating your lightswitch:
Once you’ve mounted your lights, it’s best to prepare your light switch first, to do that:
- Go to your fenders and find the best spot to put your light switch. Most of the controls are found on the right fender, however, inspect the area to see if there’s a place where you can fit your light switch.
- Before choosing the best area, make sure that your light switch won’t tangle with other parts of your mower, if the control box contains too many wires, it’s best to fit your light switch elsewhere like the other fender.
NOTE: Some residential z-turn mowers have allocated slots where you can install upgrades on them. If the slot does not fit your light switch, you can drill a hole, or cut out a piece of your fender to fit for perfect fitting.
- Whether it’s on the right or left fender of your mower, start cutting or drilling a hole for your light switch.
TIP: Personally, I dab a bit of super glue on it to secure the light switch in place. Since I still need to wire the lights on, the switch will still move and might end up widening the hole I drilled for the switch. The glue will prevent that from happening.
- Affix your light switch on the hole with its accompanying screws or bolt.
- Attach the hot wires on your switch, you can opt to secure it with electrical tape if that helps.
- Wiring your lights:
Single light:
If you used a light bar, then it’s easier to wire your light on your mower.
- Layout your wiring harness from under the fender over your engine (if your engine sits under your seat) and over the mowing deck to your single headlight. Do the same thing to the back of your mower where you’ve placed your rear mower lights.
- Secure the wires together with electrical tape or heat butt shrink connectors.
TIP: I suggest you use a single bright color for your butt connectors. This will make it easier for you to find your wiring for the lights n case you may need to rewire your lights again in the future.
Multiple lights:
When using more than one light, you have to connect the lights’ wiring first before affixing it onto your hot wire.
- Crimp your wires to each other and secure them.
- Once you’re finished, connect the crimped wires to the hot wires from your light switch.
- Layout your wiring harness around your engine and secure them properly.
TIP: Use electrical tape or zip ties to secure your wires together and away from areas that are prone to heating up. Make sure you also avoid moving parts to prevent the wires from wearing out as well.
- Lighting it up:
- Once you’ve cleaned up your wiring harness, attach the hot wires to your switch bolt.
- Then, you need to hook the battery cable to the bolt.
- Put the nut back on to secure the hot wires and the battery cable.
- Clean your area so you can test if the light is working.
- Turn on your ignition to power up your battery and switch the light on.
The Bottom Line
Installing and wiring your headlights is an easy task. The only thing you always need to remember is to keep your wires away from heating and moving parts of your mower. This is to secure your light as well as the main parts of your engine. Adding lights to your best zero turn mower is an essential upgrade that will surely lessen mowing time when the sun is about to set on your mowing job.
